Facebook Search & Investigative Tips
The most common investigative request I receive is for information about Facebook. With over 500 million active users, it seems that everyone now has an account. Let’s look at the options.
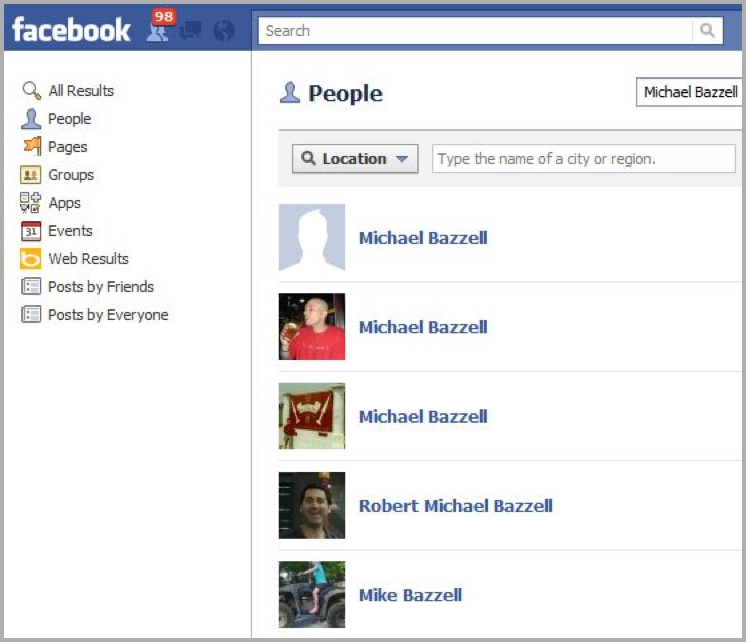
If you have a name, searching Facebook is quite easy. Unfortunately, you must be logged in to a Facebook account to search and view profiles. Creating a real or fake account is easy, and I maintain a tutorial video here. To search a name, simply begin typing the name into the top search box on the page. It should look like this:
If you see the desired subject, you can click on the name. I do not recommend this, as you may have the wrong subject. Instead, click the “See more results…” link at the bottom. This will display the profiles that match your name. You may need to scroll down and click “See more results” for common names. If you are overwhelmed with options, click the “People” link on the left menu. This will allow you to filter by Location, Education, or Workplace. The most common use here is to type in the location of your target. This will help narrow down the results.
Now you can browse through the profiles. If you do not want to create an account, you can use sites like Facebook-Search or Open Facebook Search to search without logging in. This has worked for me in the past, but there are other options.
Facebook Advanced Search will allow you to search with many options. This requires you to be logged into an account to work. Start by clicking on the “Find People” tab. This will allow a search using ANY of the following: Name, School, City, Gender, Age (Min & Max), Relationship, DOB, etc. You can even search for people within a specified radius of a zip code. This is beneficial when you are not sure which local city was listed.
Clicking on the “Posts” tab will allow you to search within “Wall” posts by keyword. This is similar to the site Your Open Book. An example here would be to search a phone number. If any user ever listed that number on a Wall post, you would get a result which would identify the person’s name and profile. I have been very successful in the past using this method to identify unknown cell numbers. I encourage you to play around with this feature. This only searches the posted content, not the name of the person posting. If your target was mentioned in a post, it would find that. I maintain a video showing full details of this app HERE. Alos try the Your Open Book, as it occasionally obtains different results. If searching phone numbers, don’t use dashes, just the last four and middle three.
Between Facebook, Advanced Search, Open Facebook Search, and Your Open Book, you should easily find the content if it is out there. If you find a profile that is blocked, and the “Post” search tools did not yield results, there are still options.
If you want to locate photos from a blocked profile, open the user’s “Friends” list. I usually filter by the last name of the target. This will identify relatives that the target communicates with. Click on their profiles and go to the Wall section. Keep scrolling and clicking the “older posts” until you see photos that the person was tagged in. These will be photo albums of other users, possibly your target. Once you see a tagged photo from your target’s photo album, click it. This will open Facebook’s new photo viewer, which we do not want. Once this is open, hit the F5 key on your keyboard. This will refresh the page, close the photo viewer, and you will now be in the original photo album of your target. You can browse all photos even though their profile is private.
Here is a poor and obviously staged example. I have a private Facebook page HERE. There are no photos shared to the public. If you click on my only friend “John”, you will go to his page. Since his Wall is public, you can click on it and see posts. One post announces that I tagged him in my (private) photo album. By clicking on the word “album” directly after my name, you will now have access to all of my photos, even though they are not on my public profile.
In summary, if your original target of interest has a photo album, and he or she has “tagged” a person that has a public “wall”, you will eventually receive a live link to the original target’s photo album. On several occasions, this has been an easy and legal way to browse photos of subjects that have blocked their profile. This may take some time, but persistence will pay off.
Finally, if all else fails, I use a subpoena. Obviously, this applies to Law Enforcement. Facebook can be tricky about the wording that is required. If you do not use the right language, you will probably receive nothing or a response without content. For a copy of the Facebook LE guide, click HERE. This will explain the detail, but here is a summary.
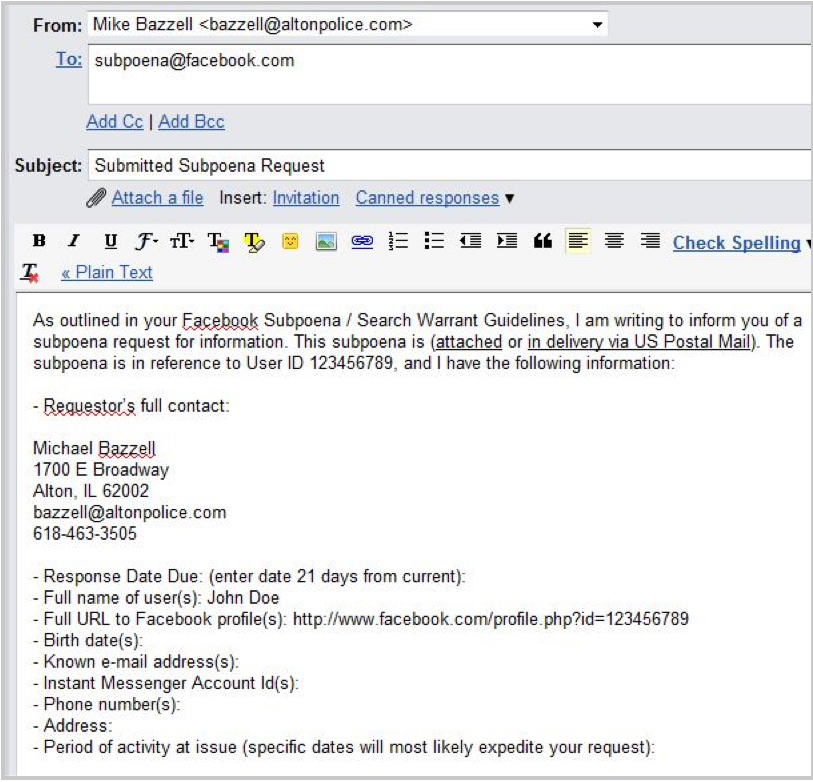
The first part of this is to get a subpoena to send to Facebook. This subpoena should have the following language (using your target’s profile number). “Any and all records identified in relation to Facebook profile ID of 123456789 to include a full Neoprint of user ID 123456789, Photoprint of user ID 123456789, User Contact Info of user ID 1123456789, and IP Log of user ID 123456789? A full copy of a sample subpoena can be found HERE. After this is sent, Facebook requests an email be sent to them with your info and the profile number of the requested target. This will allow them to send you an email with the results, which is faster than Postal. Below is an example of how the email should look.
Usually, a response will arrive in 2-4 weeks. If you have an exigent circumstance, such as an abduction, you should send an email to subpoena@fb.com with the subject “EMERGENCY MATTER”. You can also call 650- 543-4938, but this will only allow you to leave a message. If you have an ABSOLUTE dire emergency, contact me and I can help.
This post was previously published on Computer Crime Info Blog.


I am helping Washoe County Sherriff’s Department in looking into the development of a social media page. They are interested in starting a Facebook Account however they do not know how to handle the retention of records necessary in their department. This would mean capturing every posts and comment. Are you aware of anyway they can set up a page for information purposes only?
Thank you
Andrea Sundberg
Executive Director
Nevada Coalition Against Sexual Violence
Andrea,
It’s very easy to set the page so that only the page owner can originate a post and not allow comments. But that really defeats the purpose of Facebook. Have the person setting up the page give me a ring and I’ll talk him or her through it.
I can also hook you up with other LE agencies, including Sheriffs Departments who were also worried in the beginning about inappropriate posts and have found it not to be a problem. You might also consider a Facebook “takedown” policy and posting it on your page.
Lauri Stevens
978.764.9887